It goes without saying that we should all have at least one fire extinguisher in our homes. The gravity of a situation whereby your safety and the safety of your home is at risk due to fire relies heavily on your ability to know how to use your fire extinguisher effectively and correctly.
We’re probably all guilty at some stage of having a fire extinguisher sitting around gathering dust, so here’s everything you need to know before needing to use it; the right way.
Choose the correct fire extinguisher
It may come as a surprise to learn that all fire extinguishers are not created equal. Fires have different classifications, and you need to know which type of fire you are dealing with to know whether your fire extinguisher will be effective, or like throwing oil on a bonfire.
When you’re looking at household fires, they all fall into one of the following categories:
- Class A – These fires are fueled by solid combustibles. Examples of these would be wood, cloth and paper.
- Class B – These fires are fueled by flammable liquids, such as petroleum, gasoline, or oil.
- Class C – These fires are initiated or fueled by faulty wiring, appliances, or fuse boxes.
Every fire extinguisher is labeled to show you which type of fire they are designed to fight. Most household fire extinguishers are multi-purpose and labeled to be used in Classes A, B and C. If you are needing a Class K extinguisher, this one is a heavier duty appliance, and you will need to purchase this separately. We would suggest a 6-liter extinguisher, as this size is the recommendation given by the Fire Department.
You will also find symbols on your fire extinguisher that will tell you the types of fire it can battle. Bear in mind that if you see a circle with a red slash through any of the symbols, that indicates that your fire extinguisher can’t fight that type of fire.
You will also find that household fire extinguishers have a rating that lets you know what size of fire they can comfortably and safely handle. The higher the rating, the larger the fire that can be handled. Incidentally, the rating is equivalent to the number of gallons of water it would take to fight that fire.
- Class A Fires are rated 1 to 40
- Class B Fires are rated from 1 to 640
- Class C Fires have no size rating.
As you would reasonably expect, the higher-rated extinguishers are often heavier, so make sure you keep this in mind when you are choosing a fire extinguisher that you would be able to comfortably handle.
Proper Employment of a Fire Extinguisher
Once you understand the different types of fires and the correct fire extinguisher to use for the job, the next step is being able to operate it safely and confidently.
Study the steps below and review them regularly so you feel confident that you can protect your home and family.
- Identify a clear escape route
Make sure you’ve identified a clear evacuation path before operating the fire extinguisher. Remember, if you are unable to contain the fire, you will need to be able to make a safe exit. This is also a handy tip to keep in mind when considering where to store your fire extinguisher too. Ideally, multiple exits are the best options, though not always available.
- Stand Back
Facing the fire, keep your back to the clear evacuation path that you have identified. You need to stay between six and eight feet away from the fires to operate your fire extinguisher correctly.
- Discharge The Extinguisher
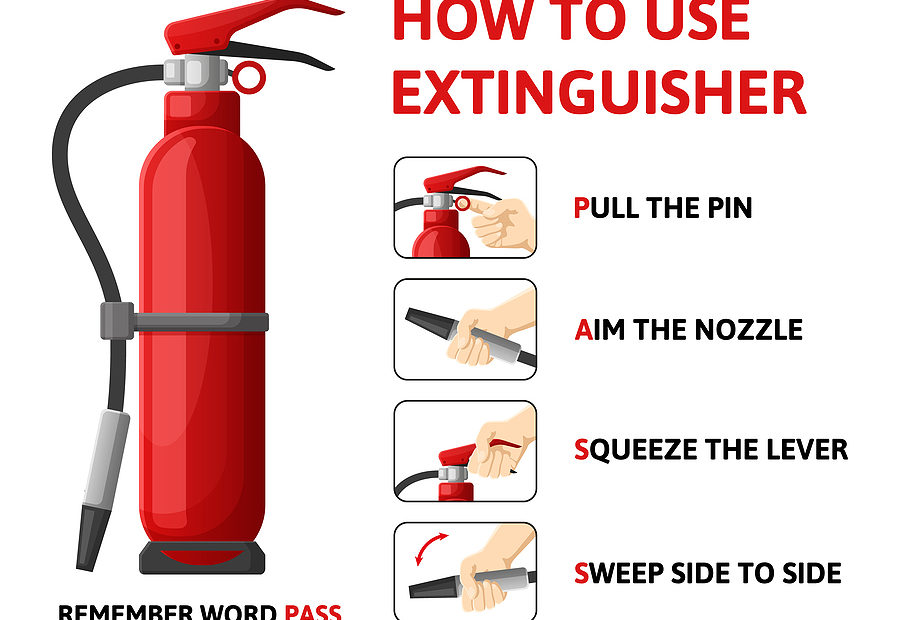
Obviously, it’s very easy to panic during the stress of a fire emergency, so to make it easier to remember, fire safety has an acronym that has always been used to help you recall the steps involved in the fire extinguisher’s operation: All you need to remember is PASS:
- P: Pull the pin on the fire extinguisher
- A: Aim to nozzle on the hose low toward the base of the fire
- S: Squeeze the lever or handle to discharge the extinguisher
- S: Sweep the nozzle back and forth, keeping the fire extinguisher aimed at the base of the fire. Move it from side to side until the flames are extinguished.
- Be Alert!
It’s most important that you keep an eye on the fire, even when the flames appear to be out. There is a propensity for fires to re-ignite, and you will need to repeat the PASS process.
- Call The Fire Department
If you did not have a chance to call the local fire department before discharging the fire extinguisher, do so now. They can then inspect the site of the fire and check that it is completely extinguished. Leaving this to the professionals will also give you peace of mind.
- Get To A Safe Place
Whether you were unable to extinguish the fire, or even if the fire is out, get to a place of safety.
Common Fire Extinguisher Mistakes
Because practicing fighting fires is not something we do every day, or even on a regular basis, it’s very easy to make simple mistakes when you are under pressure. This is a perfect example of the difference between theory and a real fire!
Remember to read the instructions: You’ve heard the saying “If all else fails, read the instructions?” Nowhere is it more applicable than here! Ensuring that all responsible family members read and understand the instructions and review them regularly when you go over your evacuation plan or conduct fire drills.
Don’t use the wrong type of fire extinguisher: We’ve listed the classes of fire above, and it goes without saying that you should never use a fire extinguisher that is not equipped to handle the fire you are dealing with. Most importantly, Class A extinguishers can’t be used on grease or electrical fires. However, you can use an extinguisher labeled Class B or C on a Class A fire. While Class K fires are technically considered a subset of Class B fires, other contents in Class B extinguishers can make a Class K fire worse, so it’s best to get a separate extinguisher for cooking fires.
Don’t let your extinguisher go off: A fire extinguisher has an expiration date, and after this date, the extinguishing agent is no longer effective. Replace your extinguishers when they pass their expiration date and check these dates regularly.
Don’t neglect maintenance: The pressure needle on your fire extinguisher should always be pointing to the green zone. When it drops into the red zone, it doesn’t have enough pressure to release the extinguishing agent. Even if you have never used your extinguisher, this can happen. If you add pressure (called recharging), the extinguisher becomes fully functional again. However, this is not a job that you can do yourself. Your fire extinguisher should be recharged by a certified fire services company. OSHA requires portable fire
Extinguisher in the workplace to be recharged routinely every 6 years, and we recommend that homeowners follow the same timeline.
Don’t forget about exits: Make sure your fire extinguisher is accessible from the evacuation exits you have decided on, preferably near exterior doors. You can also consider the most likely places that fire can start within the home and place your extinguishers close to these locations.
Don’t keep it secret: Make sure that everyone within your home is aware of the location of your fire extinguishers. Not only should they know this, but they should also be aware of your fire evacuation plan – preferably, they have participated in preparing this in the first place! Remember you may have babysitters, long-term visitors or house sitters who will also need to be made aware of the procedures that apply in your home.
Next Steps
As the boy scouts say, the best way to keep your home and family safe is to “Be Prepared”. Keep regularly reviewing how to use your fire extinguisher, where they are located and your fire evacuation plan. Stress can play havoc when you’re faced with an emergency situation, so some advance preparation can make the process less stressful.